Sunday, 23 March 2014

Day 25 - More Tinkering, IVA, Paint Protection

It's all slowed down around here of late.  The PBC is early April with the IVA now mid April.  It feels slightly frustrating (especially as the sun is out today), but at the same I don't feel rushed, so a bit here and a bit there will see everything ready in time.

I had a few hours on Saturday so tackled the following :


  1. Wiper hose on speed sensor cable.
  2. Paint Protection to front wings.
  3. Earth cable from fuel tank.
  4. fuse box cover.
  5. More trim on kick plates and fuse box cover.
  6. Nut caps to the MBE and airbox lugs in the passenger cockpit area.

Ahead of this years Lighting Design Awards, iGuzzini sent all the entrants a pack of glow sticks.  So with the help of the kids we glow sticked the Caterham.

Could have done with some more glowstick to create some tyre marks.

Paint Protection Film on the front cycle wing.  Last night it seemed to be quick marked but I guessed that was the glue drying.  By this morning it is much much better albeit with one tiny air bubble which I must have missed yesterday.  Not a huge issue.  Quite pleased with the result.  I will choose another small area to have a go at before tackling the larger more serious pieces.

I slit some washer hose and put it over the speed sensor cable.  Tie wrapped into place.

Square block, round hole, blah blah.  I could not see how this was meant to go in until suddenly, doh.  In it went.  I had it in my head the box part had to go on top of the fuses.

Not sure if these are needed but I put them on anyway.


Saturday, 15 March 2014

Day 24 - Engine and Fiddling

I have done some reading up on Blatchat about the TPS voltages for open and closed throttle etc.  I also recieved a parcel from Derek with the correct fuel cover and a fuse box cover.  PPG also delivered the film so I need to set about doing that next week.

The car is also booked in for a PBC in the Midlands.  I was going to get the IVA then drive to the PBC but engine hunting woes have put paid to that.  To be honest its probably more sensible to go PBC then IVA.

I read on BC that I needed to set the TPS to 1.03v between the white and brown wires.  So I did, see pic.  I then turned the key to position II and disconnected the red from the battery.  I left that off for a few minutes.  Took the key out and connected the battery up again.  Having done that I tried to start the engine but no luck.  It would catch and keep itself running without a bit of throttle.  I set about playing with the threaded connection on the throttle position and found the engine would start when set to 1.07v.  

However this then created hunting when the engine was warm.  To remove the hunting when the engine was warm I had to set the TPS to 1.11v.  

Regardless of the TPS setting I was getting a lumpy delay when flicking the throttle and it seemed to want to die before finding it's settled point.  However with 1.11v that was at 1400RPM (according to Draper meter).  So I give up.  The car has to go for it's PBC just so it will tick over cold and warm, not hunt and accelerate sensibly.

Not needed I believe but seems one less area I can be pulled up for.  Just hope the nose cone goes on ok.  I did trim the cap down so it sat flatter on the bolt head.

Again not needed apparently but may aswel put it there until it falls off.

The new fuel filler cover, looks and fits much better.  I now have a box of bits to send back to Derek.  Makes a change to send him a box of bits instead of getting a box of bits from him.

I received what the label said was a RHD fuse cover but from the pictures on the web this looks like a LHD unit.  Also for the life of me I can't see how it would fit on.  It's going back !

So the engine is not sorted and that's the bit that worries me.  Everything else  is just decor.  Roll on the PBC and a smooth running car.


Saturday, 8 March 2014

Day 23 - Paint Protection, IVA Test Date

IVA 
I applied for a test date on the 24th April and today I was given a date for the last week in March.  I have a few jobs to do prior to the test :

  1. Set up the headlights as best I can.
  2. Sort out a fuse box cover.
  3. Sort out a fuel filler cover.
  4. Sort out the damage to the nose cone.
  5. A wash and vac.
  6. Bleed the brakes again.
  7. Bed the brakes in on the way to the test.
  8. Add a few more 19mm M12 nut caps.
  9. Add some washer pipe sleeving to the speed sensor cable.
  10. Add some washer pipe sleeving to the repeater wire on the upper wishbone.
  11. Get the speed sensor working.

Engine Hunting and Flat Lining
I have had the engine running a few times now.  I have had a lot of white smoke but today I ran it until it was warm and the fan was kicking in and the white smoke died down.  The fumes still smelt rich although that may have been the garage being full of smoke.  (The door was open).  Anyway I have attached a video as it does not seem right to me that the engine should lag on a press of the throttle and die very low.  If you have any thoughts as to whether this is normal or not I would appreciate it.  I will check the idle RPM seperatly to the caterham tacho, I will also test the Brown / White voltage on the TPS.

Caterham Tick Over Video


Paint Protection Film
I finally decided I would put some film on the car.  Went round the houses as to which one and in the end settled on the idea that any are better than none.  Hopefully it will arrive this week and I can apply it next weekend.  Premier Paint Guard


Caterham and the PBC
Really wondering about the value of the PBC.  I have read and heard so many horror stories of high costs to put right stuff that should have been made clear in the manual.  The last two questions I have had for Caterham were met with 'we'll do that in the PBC'.  My view, 'how about sorting it now given that I have already paid a lot of money for the car'.  

I have been quite happy with the process of the odd bit missing or needing a bit of clarity with regards washers etc.  I consider it as simply part of the experience and indeed the speed of response has been nothing but first class.  In many ways it is inevitable for a low volume manufacturer to get every thing spot on first time.  But just in the final stages I am starting to feel there is too much reliance on the PBC to pick up on things that Caterham are aware of but have not sorted out.  I imagine the feeling of the last few days / week will fade once the car is on the road.


Brake Warning Switch still ON
When I revved the engine the first time of starting the brake warning light came on.  The LADS confirmed it was due to the brake fluid being low and so we topped it up and low and behold the light went out.  However when I turned the engine over again this weekend and rolled the car down the steep drive, the light came on again.  I checked the level but to be honest I can't get anymore fluid in.  Is it likely to be an issue with the car going down a steep drive and fluid getting onto the contacts inside the master cylinder?

RESOLVED - Thanks to Paul at LADS, it turns out that the light also comes on with the handbrake so there is no problem.


Air Intake Misalignment
The image below shows how badly the air intake lines up with the mesh & hole in the bonnet.


Sunday, 2 March 2014

Day 22 - More IVA, Mirrors, Stickers

Managed a couple of hours this afternoon. I put the centre mirror on, a few stickers, a few more caps and some glue on the upper wishbone trim.

I put the Caterham stickers on the wheel hub.

I cleaned the glass with some alcohol wipes before mounting the center mirror.

The stickers on the back went on.

The fuel filler cover went in.  It surprised me at how much of the fuel system is still on show.  It turns out this is not correct and Caterham said they would sort it during the PBC.  However I want it sorting before the PBC as I am getting the car IVA'd before the PBC.  Just need Caterham to send the correct part.

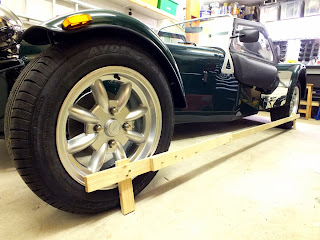
The piece of wood is my way of testing that I will actually be able to get the car down the steep drive.  Would have been a nightmare to build it and not get the car out of the garage.  I had done this previously when laying the drive but I was somewhat guessing at the true gap under the car.  My car now it is down on the wheels with 20PSI in the tyers, sits at 125mm to the lowest point in the centre of the car.  When I push the stick down the drive it seems as though the car will have 25mm clearance at the worst point of the curve.  Which seems fine to me.

Saturday, 1 March 2014

Day 21 - IVA, Driving, Bonnet

A great start to the day with the two boys each getting MOTM in their respective football games.  After lunch I decided to go and do the painstaking IVA stuff.  I found loads of info on blatchat, had the Caterham list and the LADS advice to go with.

First job was to take the sharp edge off the exhaust bracket.

I added some trim to the bracket.

The exhaust back on the car.

This is the original widescreen wiper.

This is the wiper after it has had the end rounded with a file.

I added some trim to the passenger side knee panel.  I also added some trim to the passenger side steering wheel bush.

The wife and myself then lowered the car to the ground.  I have to say it was quite a task without a high lift jack.  I had to use planks of wood and drop the axle stands one pin at a time.  It was a worry watching the car wobbling about and to make matters worse I whacked my thumb with the axle stand.

I had to undo the ARB bolts and drop the bar down so I could torque up the wishbones now that the car was on the deck.  

Having put grease in the front hubs (thanks LADS), I got some new pins from ebay and inserted them as shown.

When I went to put the silver plastic gaps on the wheels the split pins were preventing them sitting flat.  So I took the dremmel to the split pin.

Finished wheel.

Again, the finished wheel.

The IVA pack is kind of good from Caterham but you are then left to guess where the bits should go.  Some are obvious and some are less so.  I used these long bits to go over the brake unions on the body.  I had to split them to get them over the pipe.  I superglued them back together then filled them with silicone.  !!! Bloody Manual could have mentioned the need for these when I put them on first time around.

The bolt covers for the front wheels are fairly obvious, but, do you need one on the lower upright bolt.  According to Caterham you do not need covers on the upright bolts.  I have however purchased some more from ebay anyway.  For the sake of £2.20 for 10 I may aswel take away the chance for the IVA test center  to fail the car.

Should these be here ?  I have no idea but where else should I put them?  Caterham said these are not needed.  However with nowhere else for them to go they may as well stay there.

The Caterham IVA guide mentions gaps on the starter, I hope this is correct.

I finally reached a point where I thought I could put the nose on and not really need to take it off again.  

I was somewhat annoyed to find the nose slightly damaged on one side (1/2" of flakey fibreglass on the edge under the indicator).  I will mention it to Caterham on Monday.  N.B. Apparently Caterham will assess the damage during the PBC and decide a course of action.  Does that mean charge me to fix it ???

It's looking good and indeed very small now it is on the floor.

Me and the eldest playing with switches and driving a yard forward then a yard back.

Another pic of us playing.