Sunday, 26 January 2014

Build Day 14 - Oils

I finished the cycle wings first off today, wired the indicator repeaters and clipped all the wiring neatly to the chasis. With the indicator repeater I found it easier to thread a wire up the cycle wheel stantion and pull the repeater wire back down. Also I used the cycle wing fixing bolt as the earth cable point.

Making the obigitory cut down allen key.  The dremmel was spot on.

MTL oil going into the gearbox.

More MTL

Keeping an eye on the levels

I think that is it.

I was sure this went in further but it seems tight.

Diff oil filling contraption.

Diff oil went in ok.  Millers, 90W GL5

6.5L of coolant in.  I disconected the heater inlet as Caterham suggested and I filled from there.  I mainly filled from the expansion tank but I also follow Tom Woodis and filled towards the Modine from the Heater Outlet point.

Eezi bleed connected to the tyre.  The tyre was deflated to 20PSI before connecting to Eezibleed.

Desperatly careful not to drop any fluid onto the paintwork.  An effortless process going from Offside Rear, Nearside Rear, Offside Front and Nearside Front.  Then repeated for luck.  I reckon I used just under 1/2 Litre.

The car coming on nicely.

Headlights and indicators working first time.  Hark at me.

A few nice shots of the flotation device.


The awkward clutch bleed nipple.

Saturday, 25 January 2014

Build Day 13 - Painting, Cycle Wings, Bits

Today started with a check of the bolts I had torqued or knew I needed to tourque.  I had a realisation that having not tourqued the upper wish bones (because I read it somewhere), then I would now need to remove the ARB to do so once the  car is on the ground.  (Not happy).

I then decided I would put a coat of Hammerite Stone Chip (with waxoyl) on the underside of the car.  From there I moved onto putting the two cycle wings on.  Finally I tackled the cross threaded rear brake unit.

A question was put on Blatchat about bump steer.  Having had a look at my steering rack it appears I have the spacers as part of the brackets.

The oil breather bottle and bracket arrived late which I was not that bothered about until I came to fit it.  Once you have put the coolant overflow, radiator and pipework in place, it is quite hard to drill the frame and fix the bracket.

Job compelte

The first cycle wing took a while as I checked, checked and checked again before I drilled the wing and stays.  After I had finished it was pretty quick to do the others.  After drilling the stays I did paint in the holes and on the stays to prevent rust.  As there will be a lot of spray here it makes sense not to have a freshly drilled hole in steel.

Spent a good hour marking up what was tourqed etc.

The wiring is a very tight fit.  Hopefully I have enough heat shrink, tape and grommits in to pass the IVA

A few weeks ago I thought I had stripped the brass connection.  Caterham said they would fix it during the post build check.  To be honest with some of the posts about PBC costs I didn't want to wait and get a shock charge.  Derek kindly sent me a new brass connection.  However when I stripped it apart tonight I found it was the flexible hose thread that was knackered.  I too a small file to the thread and fixed the connection.  Interestingly if you use a flat washer and anti shake washer then the brass connection meets the nut and does not fully pinch up.  Hence I removed the flat washer.  I hope that is right.

Sunday, 12 January 2014

Build Day 12 - Bits and Pieces

I have reached a point where I have 4 boxes left and everything seems to be a fiddly small job.  The lights, tidying the wiring, trim details, breather bottles, lugs, fluid filling etc.  Today was 3 hours of small jobs.


Derek sent the fixings and washers to finish the air intake box.

Derek also sent the lug so I could earth the temperature controller.

Derek sent the red power cable so I could finish the wiring to the solenoid.  I thought I had stripped the solenoid bolt at first as the first few threads were missing but it seems that is normal.   As I cut the battery lug cover with snips I managed to crack the lid.  Superglue.

With the main wiring done, I couldn't resist turning the key.  The immobilisor worked, the fuel pump kicked in, then the lights came on on the dash.  So far everything seems to be working.  


I have decided to give the inside of the wheel arches a couple of coats of the hammerite underbody paint.  I am not 100% sure this will stop the star marks on the fibreglass but it must surely help.  

The handbrake seems off center at the moment.  The left hand side black sleeve is shorter (yellow) than the right hand side (green).  Not sure if that will sort itself out over time.

Spent some time under the car tidying the wiring.  I keep seeing PBC's saying wiring needed tidying.  Not sure how good / bad this is compared to others who have then been told they need to have it tidied.

Derek sent the cat exhaust shield so that went on.

Decided to dinitrol the inside of the headlights before they went on the car.

Friday, 3 January 2014

Build Day 11 - Rear Wheels (Left)

The main task for today was to get the hub and disk onto the Left hand side.  As expected having faffed with the right hand side, the left hand side was much quicker and easier.  Other jobs included :

  1. Fit the speed sensor
  2. Contralube 770 all the electrical connections
  3. Move the axle stands to sit under the de-dion
  4. Silicone the edge between the chassis and lowered floor to prvent water ingress.
  5. Spray a bit more dinitrol in.
  6. Tidy up the caterham boxes and my tools.

When I first put the sensor in the Rear ARB bracket I noticed only half the sensor was looking at the wheel on the driveshaft.  I had read from other blogs that this may be any issue.

2 minutes later, courtesy of the dremmel and the sensor was in a far better position.

NOTE - Now that the engine is running and I can check the speedo, I found that even though I had moved the sensor to be more aligned with the teeth it was not good enough.  I ended up removing the sensor bracket and adding insome washers between the bracket and ali block.  This pushed the sensor to the center of the teeth and suddenly I was able to register speed.

What are these and do I need to use them ?  Can't see a use for them just yet.

Found a use for the above items.  It turns out right at the back of the manual there is a picture showing them located in the rear brake caliper.  Must be something to do with stopping the brakes squeaking or making sure the disc springs slide on a clean surface.

The left side completed.

I thought this may be useful to others.  I kept using the M10x65mm when I should have used the M10x55mm.  

As above.

Suddenly there are very few Caterham boxes left in the garage.

Thursday, 2 January 2014

Build Day 10 - Rear Wheels (Right)

The plan today was to get both the rear wheel hubs on.  However thanks to the loose manual with the way it fails to say which bag each bolt comes from and indeed at times suggests the wrong bolt then it took about 4 hours to do just one side.  If I took things off once, I took them off 3 or 4 times.  I managed to get the right hand side on and I will do the left hand side tomorrow afternoon.  I suspect it won't take as long.

I was surprised to find no watts linkage or RARB in the kit of parts.  I had read it was standard although when searching BC tonight it appears that it is now an option.  Equally there seems mixed feeling towards all the stuff anyway.

I couldn't get this connection to bite at all.  I had enough slack on the fixed pipe to dress it neatly but it wouldn't start threading.  When I took a closer look there was no thread in the brass connector.  Not sure how that one gets resolved.  I don't know if I will have to make a new pipe or ???

So the on/off journey begins.  I thought I had cross threaded the bolt into the de-dion as it was stiffer than the other side.  It started ok but went very stiff about half way.  My head kept saying take it out to check and when I did it was ok (phew).  It was still stiff to go in again but at least I have the comfort of knowing I didn't cross thread the de-dion.

Again the manual lacks clarity as to which way the 'p' clips should be riveted onto the de-dion.  As it happens the nearest pipe could only go that way or it would not reach the 3 way union.

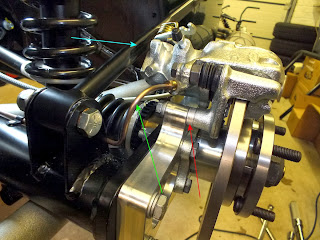
The notches in the brake caliper must line up with the green line.  A pair of wide pliers with a gentle squeze was enough to twist the piston.  Why it is not lined up ready I don't know.

The notch is at the bottom of the brake disc.

Piston lined up as required.

The right hand hub connected.  

Make sure the wasted side of the bar faces outwards to give the caliper more room.  You also need to bend the brake pipe yourself.  Make sure you put a wide radius on the pipe and not a sharp kink.  Also don't forget to install the 6mm spacer.  I found I had to open up the spacer internally a little with the dremel as it would not slide all the way down the M10 bolt.

A close up of the washer / spacer arrangement.  Why can't Caterham use some colour photographs ?

The completed side.