I was surprised to find no watts linkage or RARB in the kit of parts. I had read it was standard although when searching BC tonight it appears that it is now an option. Equally there seems mixed feeling towards all the stuff anyway.
I couldn't get this connection to bite at all. I had enough slack on the fixed pipe to dress it neatly but it wouldn't start threading. When I took a closer look there was no thread in the brass connector. Not sure how that one gets resolved. I don't know if I will have to make a new pipe or ???
So the on/off journey begins. I thought I had cross threaded the bolt into the de-dion as it was stiffer than the other side. It started ok but went very stiff about half way. My head kept saying take it out to check and when I did it was ok (phew). It was still stiff to go in again but at least I have the comfort of knowing I didn't cross thread the de-dion.
Again the manual lacks clarity as to which way the 'p' clips should be riveted onto the de-dion. As it happens the nearest pipe could only go that way or it would not reach the 3 way union.
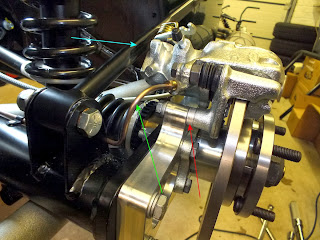
The notches in the brake caliper must line up with the green line. A pair of wide pliers with a gentle squeze was enough to twist the piston. Why it is not lined up ready I don't know.
The notch is at the bottom of the brake disc.
Piston lined up as required.
The right hand hub connected.
Make sure the wasted side of the bar faces outwards to give the caliper more room. You also need to bend the brake pipe yourself. Make sure you put a wide radius on the pipe and not a sharp kink. Also don't forget to install the 6mm spacer. I found I had to open up the spacer internally a little with the dremel as it would not slide all the way down the M10 bolt.
A close up of the washer / spacer arrangement. Why can't Caterham use some colour photographs ?
The completed side.


I have mounted my brake pipes exactly the same way and also found the bolts into the De Dion very hard to screw in. I assume it must be to do with the powder coating which seems slightly rubbery to me!
ReplyDeleteHave to agree on the colour photos! The photocopied black and white ones are of little use!
ReplyDeleteHi Can
ReplyDeleteyou tell me, if the hand brake adjuster is fitted on the wrong side of the car will it make any difference to the adjustment of the brakes