Saturday 28 December 2013

Build Day 6 - Engine

Cousin Paul arrived nice and early today to help tackle the issue of getting the engine in.  With a very kindly donated engine hoist we set about measuring up the engine and hoist and the ummm low garage ceiling height.  We used the hoist to first drop the car down to the lowest axle stand height.  We then strapped up the engine and set about the fidly job of weaving the engine and gearbox into place.  Some lessons learnt are below :


  1. Get a spanner or wrench onto the belt tensioner on the front of the block, loosen and remove the belt.
  2. ***** Remove the alternator *****
  3. Make sure the engine is balanced (left to right) in the sling but at a 30 degree angle front to back.
  4. ***** Remove the alternator *****
  5. Take the engine support bracket off the block.
  6. ***** Remove the alternator *****
  7. Put the LH and RH rubber mounts onto the car loosely.
  8. ***** Remove the alternator *****
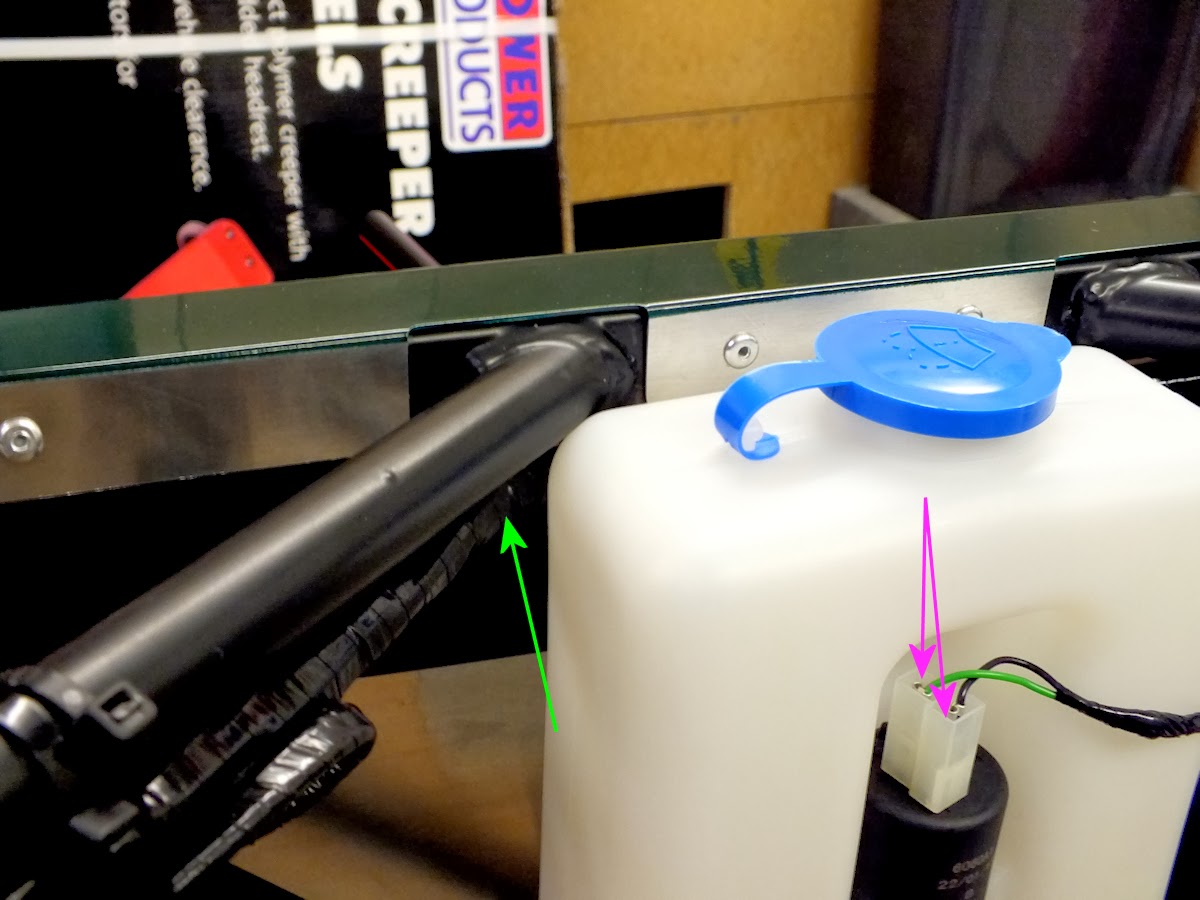
  9. Remove the water bottle bracket and feed it in from below later on.
  10. When securing all of the engine and gearbox bolts we put the arms onto the engine block loose once the engine was roughly in the right place.  We then put the large bolts through the brackets and started the threads in the engine mounts, we then pushed the bolts through the gearbox mount.  Once everything was in loose, we tightened the engine bolts, then the engine mount bolts then the gear box and only then released the hoist.
  11. Go slow.
I have the 2.0L Duratec and removing the alternator is essential but the starter motor stayed on the bellhousing.


We only had a few inches spare before hitting the roof.


Second attempt with the alternator removed.


Yi coming in for a look.

It's in.  Wow.  Now for the back end.  When you hear people say it's a tight fit, it really is a tight fit.  millimeters to spare, literally.

Take the bottle bracket off (purple), take the alternator off (yellow) and jiggle the bracket bolt a lot (blue).

Rotate the nut on the belt tenssioner (red), this moves the wheel (blue) so you can remove the belt (purple). 

The bottle went back in from below.  Keep it attached to the bracket.

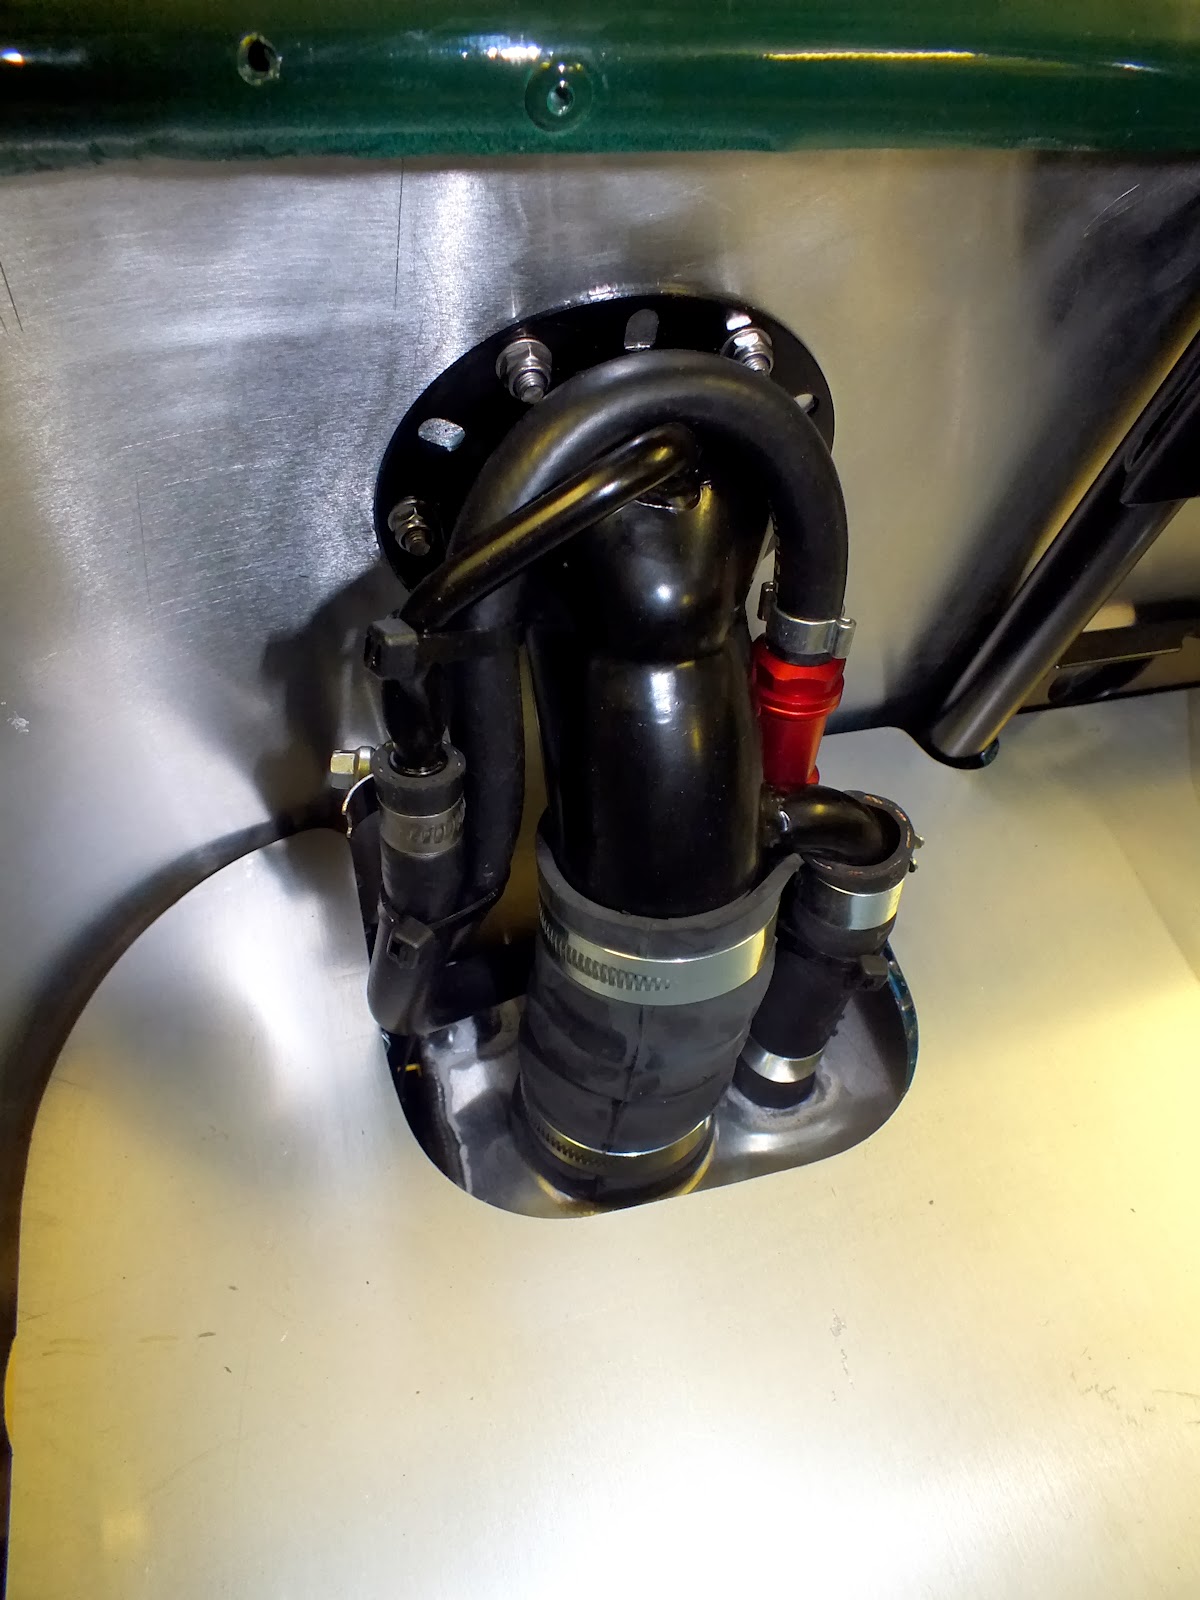
Hardly any room at all.  We did cause a little bit of damage to the heat shield installed by Caterham.  I'll need to get some reflective tape to fix it.

The front ARB boots arrived today.  Thanks Derek, so the Front ARB was finished.  Plenty of grease.

The set screws arrived from Caterham today so they went into the top of the heater.

Picture of christmas days nozzle attachment.

Thursday 26 December 2013

Build Day 5 - Horns, Water Nozzle

Did the usual santa things, christmas day family things, christmas meal, falling asleep etc. then couldn't help myself venturing down to the garage to do a bit on the car :

  1. Fit the horns now I know I need nyloc part 10 from pack 30P012A
  2. Fit the gearbox rubber mount to the gearbox.  The 2.0L Duratec has the bellhousing mounted to the engine already so you do not get fastener pack 36G006A.  However you do need some of the fixings.  So for the gearbox rubber mount use the M12 x 25mm from pack ZGB14.  
  3. Loosen the filler plug in the gearbox.
  4. Fit the water bottle.  Remove the water bottle bracket first, fit the bottle, then put the bracket back on.
  5. Fit the screen washer jet to the scuttle.  I put a good dollop of silicone under the washer jet as there is no rubber washer to stop water coming in. 

Undo the bolts indicated by the red arrows.  Remove the bracket and add the water bottle before refixing the bracket to the chassis.

The wiring loom was putting stress on the bottle and bottle bracket so I removed one of the tie wraps and pushed the wiring loom away from the bottle.  (Green Arrow).  I have also taken to filling any electrical connector with silicone if it sits upright like the ones indicated by the purple arrows.  Seems obvious to me that spray will land in these and then stay there rusting the connection.

I tie wrapped the water hose to the wiring loom with red ties so I know which one to cut should I need to remove the hose.  I used blue tie wraps for the heater connector when I tie wrapped that out of the way.

Again red tie wraps to keep the washer hose tidy behind the dash.  It takes a wierd body angle to get the washer pipe onto the jet nozzel under the dash.  I fitted the nozzle first including the silicone seal.  Then went back to fit the hose.

Someone else suggested using a breaker bar to undo the 13mm nut on the horns.  I didn't believe them but they were right.  Use a breaker bar.  Also as above, I have filled the connections with silicone to prevent water sitting in and rusting the connection.


Sunday 22 December 2013

Build Day 4 - Mounts, Brakes

More like tinkering and teetering around the edges to be honest.  Went to the garage with good intention of getting the dinitrol into every gap possible but couldn't resist picking up a spanner instead.  So  :


  1. The engine mounts went on (see photograph of problem engine mount bolt),
  2. I tried to put the horns on but I was missing some nylocs (I think), 
  3. I put some protective piping on the chassis ready for the engine going in, 
  4. I torqued up the bellhousing and gear box bolts.  An interesting one here is that the gearbox bolts needing torquing to 61Nm but you would have thought that would have been done seeing as the unit arrives pre built. Also be very careful to read the manual as the bellhousing to engine is torqued to a higher rating than the bellhousing to sump.  Not all of the bellhousing bolts are torqued up the same.


I took the paint off the top and bottom of the LHS engine mount to get a good earth.  I also took the paint of the chassis in this area.  I will hammeritte or equivalent the connection once it is torqued up.

A picture of the front brake pipe inside the engine bay.  The inside only needs the antishake washer and nut.  Otherwise the connection will not sit right and the connection will leak when you fill it with fluid.

Problem bolt head / chassis.  The bolt just would not go past the chassis frame.  John from LADS had the answer.  Grind one side of the bolt head off.  If only I had done that instead of the hammer approach.


A job for the Chrsitmas break is to lift the scuttle up slightly and apply some clear silicone between the side and the body panel by the door trim.  You can see daylight through the gap so with spray from the tyres it is likely water will come into the cockpit this way. 

Rightly or wrongly I have been sending Derek at Caterham emails as and when I find an issue or have a question.  This weekend I sent 7 e-mails.  This ranged from I need a few washers, to I have a few spare washers to which nuts for the horns.  I trust he is not fed up with me yet.

Saturday 21 December 2013

Build Day 3 - Front Brakes

The kids and wife ventured out to watch a panto giving me the best part of a day in the garage with the car.


Added the calipers and brake pads.  I like the pin arrangement for holding the pads in.  Seems a much better way of accessing the pads than my tintop.

There are no notes on installing calipers.  I guess part of that is that it is so simple.  However it does require the flat washer (red) to go between the caliper and the hub.   Spring washer (yellow) required.  The green arrow indicates the direction of the flexible brake hose.

The red line indicates the direction of the flexible hose with the yellow arrows indicating the need to ensure the hose does not foul the suspension when you turn the wheel from lock to lock.

I installed the heater module albeit none of the pipework.  I guess I was just putting off the whole gearbox, bell housing, engine thing.  I did put a large run of silicone between the heater and the body of the car (yellow arrows).  The upper bolts were missing (red arrow).


Heater ears pointing down.  Thanks to everyone who has pointed out the need for the ears to point downards.


I got the rubber bushes into the metal holders on the front ARB easily enough.  I also got them onto the ARB itself.  Something must be wrong as others have struggled.  I did use a fair bit of Floplast.  However just as I thought all was well, I found the boot gaps were missing.


I fitted the spring washers which were missing last week.  Wish I hadn't put the damper in last week without the washer.  It seemed to want to stay there today.

Pretty pleased with my silicone smearing.

I wasn't going to do this today but after reading the manual it seemed fairly straight forward.  I did have a moment with regards bolting the gearbox and bell housing together as there was a 'front seal - gearbox 5&6' part which I couldn't find a home for.  Consensus was that it was a spare.  http://caterhamparts.co.uk/product.php?id_product=2441 

Next job or at least one of the next jobs is to get the engine into the car.

Monday 16 December 2013

Build Day 2 - Front Suspension

I wasn't going to do a lot on Sunday afternoon but the kids were tired after rugby and so I thought I would tinker with a few bits and read the manual.  Next thing I know is the front suspension is finished, (except for a few washers and torquing up).

End of day 2 and with the tools put away, the car looks
like this.  Managed to whack my head on the cycle
wing supports while picking up tools.  I do not 
recommend it.  Dwindling boxes.  Well 2 less.

As others have said the other side always take less
time than the first.  So going by that statistic it must
be compulsory to buy a second caterham.

The car suddenly takes up more room in the garage
compared to when it arrived. 

To washer or not to washer.  Well the manual does not
mention washers and indeed there are none in the pack 
that would suit.  Paul @LADS and Derek @Caterham 
confirm they are not needed on the upper wishbones.
This nut was a asqueze to get on as it kept pinching the
IVA trim, however I would hate to have to put the IVA
trim on after the nut is in there.  Just take your time
and keep checking if it is clear of the nut.

Nor do you need one here.  

A tidy workbench.  Roll on next weekend the kids
are at a panto.  


Sunday 15 December 2013

Build Day 1 - Trim & Protection

Peter and Paul from LADS popped around this morning and gave me some great advice on a building a Caterham.  The first piece of advice has already been taken on board and the IVA trim has been glued in first and not last.  I only intended to do a little bit today and before I knew it the wife was knocking on the garage door as it was tea time.  Loved every minute of the day today.

I have 6 M6 washers instead of 6 M8 spring washers.  The upper wishbone rear connector was not listed as having a washer which seems odd.  Also there are three types of spacer which can fit in the upper wishbone and so I need to double check which one it is.  Finally should every wishbone connector have a bush in it?  A quick check and the answer is no.  Only put them where they say.  I did find the one that measure 10mm inside and 1/2 outside just would not go into the wishbone, it wasn't tight, it was simply too big.  So I used the 10mm ID and 12mmOD and that was a perfect snug fit.

To get the IVA trim around the front connector of the 
upper wishbone I just had to cut a V in the back of the trim.

Trim all siliconed into place.  I put dots of silicone 
every 2 cm's inside the trim.

A roll of masking tape.

Lots of bits but not always the right bits in the right boxes.

Steering rack in (loose)

LHS nearly done albeit I have questions 
about washers and spacers

I put in a draw wire now so that my life may be a little
easier later in the build.

Friday 13 December 2013

Sorting out the boxes

I spent the evening opening boxes to find what was where.  Didn't go so far as to check every last nut and bolt but I found 4 wheels, 4 shocks and an axle so figured that the bulk of it is there.  My wife thinks that there is far too much done already.  Then again she is a mechanical engineer and would rather be welding the chassis.
I have now labelled the boxes so I know 
roughly where everything is.

Really nice to ope boxes and see your name on the bits

I have read about the need to extend the 
breather tube but looking at the set up, the 
feeder tube is pretty long.  Does anyone know
if Caterham have now extended the tube.

Found the Steering Wheel.

Found all the tools that I got free courtesy of Draper 
and Caterham for the 40th Anniversary.  Axle stands
are great and better than what I had.  There are loads 
of tools not just those on show.